

Table of contents
- Project Details
- Creating providers and variables configuration files.
- Creation of backend and State locking
- Creation of VPC and Subnets
- Creation of Internet Gateway
- Creation of Route Tables
- Creation of Application load balancer
- Creation of AutoScaling Group
- Creation of RDS Instance
- Terraform commands
- References:
Project Details
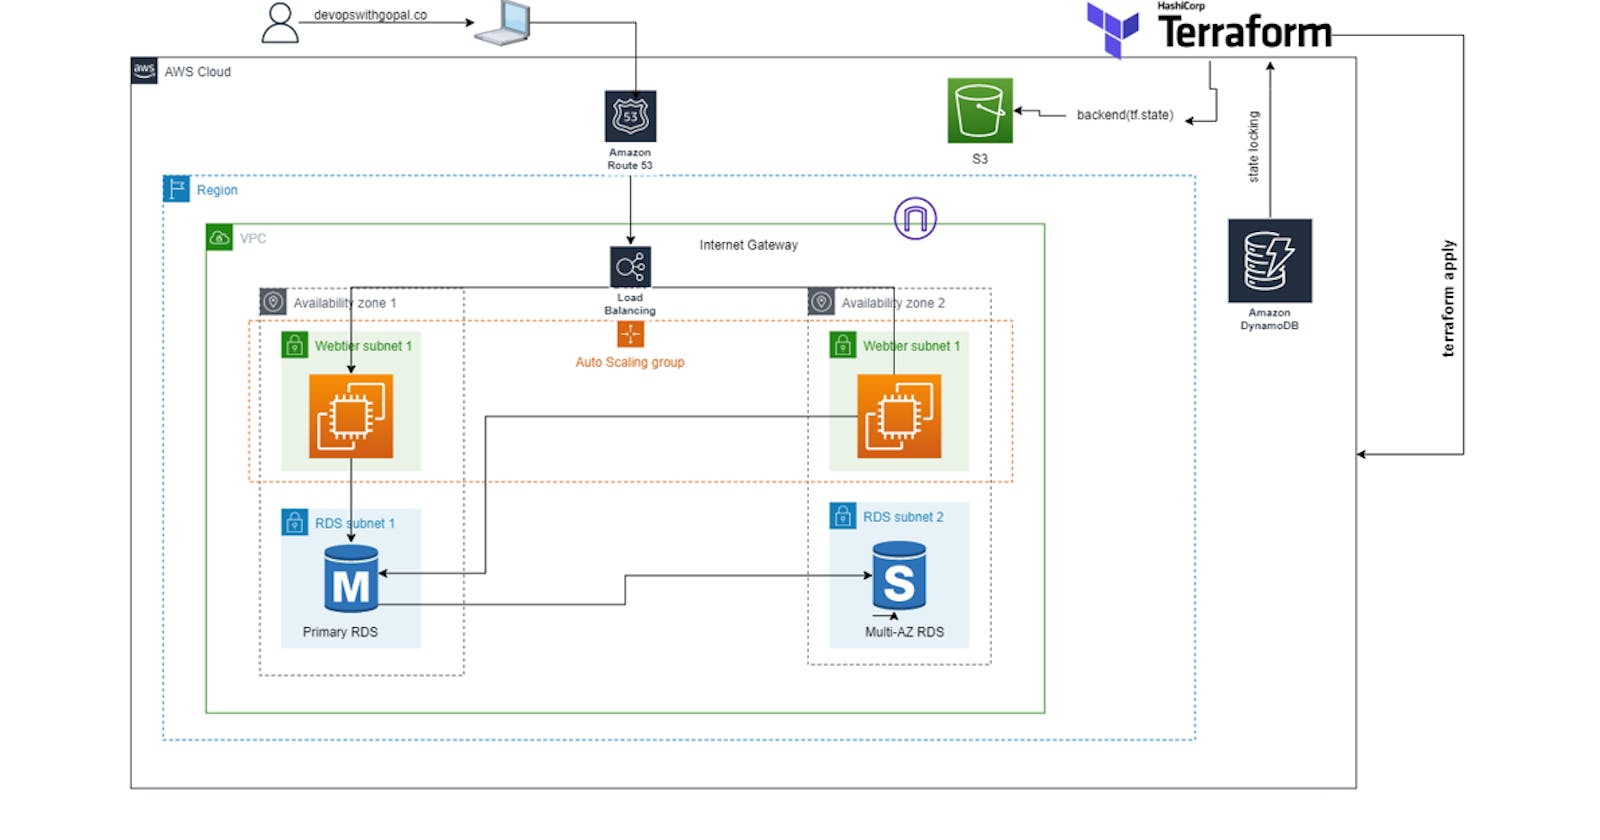
In this project, we will be creating 2 tier application in AWS using Infrastructure as Code(IAC) tool Known as Terraform as shown above in the architectural diagram. HashiCorp Terraform is an infrastructure as code tool that lets you define both cloud and on-prem resources in human-readable configuration files that you can version, reuse, and share.
Prerequisites
AWS account Accesskey and Secretkey.
AWS CLI and Terraform Installed in your system
Any IDE i.e VS code or Pycharm.
Creating providers and variables configuration files.
Create a directory(say 3week) under which we will be writing all our configuration files.
Create a providers.tf file inside that directory.
 provider "aws" {
   region     = var.region
   access_key = "A****************"
   secret_key = "mi***************`"
 }
Note : It is preferred to store your key and secrets in the environment variable using the below command in the terminal.
 $ export AWS_ACCESS_KEY_ID="accesskey"
 $ export AWS_SECRET_ACCESS_KEY="secretkey"
 $ export AWS_REGION="ap-south-1"
Create a variables.tf file to declare all the variables that are required.
 variable "region" {
   default = "ap-south-1"
 }
 variable "vpc_cidr" {
   default = "172.33.0.0/16"
 }

 variable "subnets" {
   type = list(string)
   default = ["webtier-public-subnet1","webtier-public-subnet2","dbtier-private-subnet1","dbtier-private-subnet2"]
 }

 variable "ec2_ami" {
   description = "AMI to Launch Instance"
   default =  "ami-0607784b46cbe5816"
 }

 variable "instance_type" {
   default = "t2.micro"
 }
Creation of backend and State locking
A backend defines where Terraform stores its state data files. Terraform uses persisted state data to keep track of the resources it manages. Most non-trivial Terraform configurations either integrate with Terraform Cloud or use a backend to store state remotely.
Terraform State Locking will make sure that the state is “locked” if it’s presently in use by another user. For this, I have already created on dynamodb table
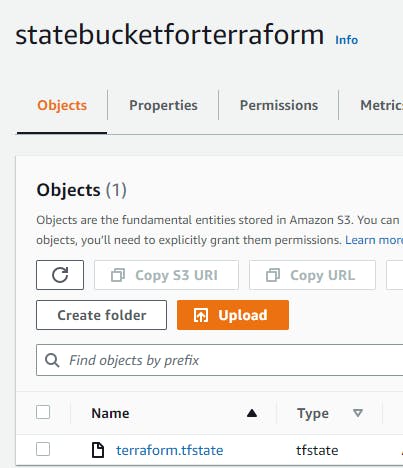
- Create a backend.tf file. Here I am storing my statefile in S3 bucket which is already been created and Dynamodb table for state locking.
## here we need to first add s3 bucket to store tfstate file and dynamodb table for state locking.
## apply terraform init so that new backend can be initialized

terraform {
  backend "s3" {
    bucket = "statebucketforterraform"
    key = "terraform.tfstate"
    region = "ap-south-1"
    profile = "gopal"
    dynamodb_table = "state-locking"
  }
}
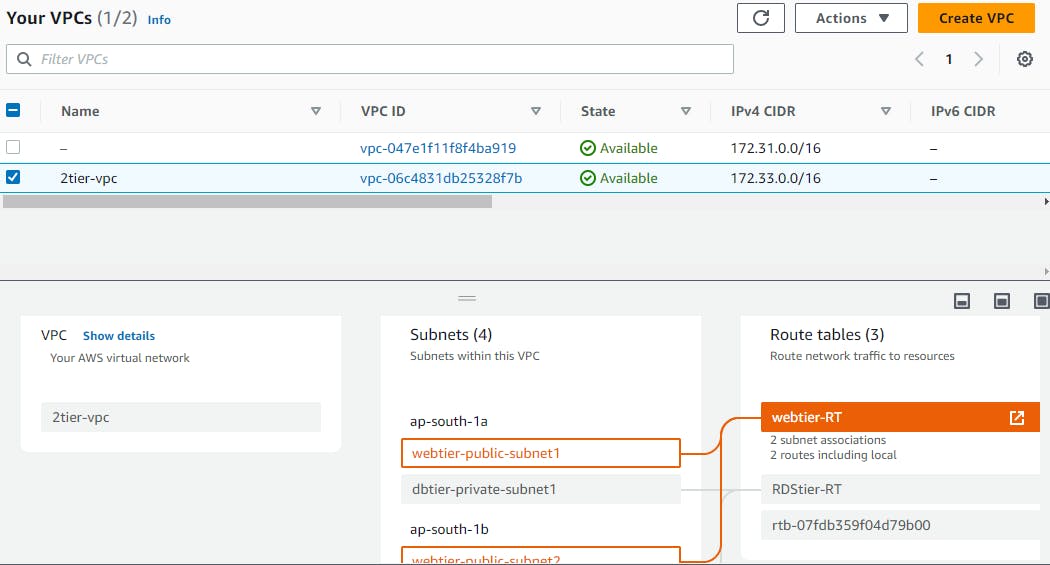
Creation of VPC and Subnets
Create vpc.tf file. In the below configuration file i have created one VPC and 4 subnets i.e. two public subnets for the webtier and two private subnets for the database tier.
 resource "aws_vpc" "two-tier-vpc" {
   cidr_block       = "${var.vpc_cidr}"
   instance_tenancy = "default"
   tags = {
     Name = "2tier-vpc"
   }
 }

 data "aws_availability_zones" "available" {}

 resource "aws_subnet" "subnets" {
   count             = 4
   cidr_block        = "${cidrsubnet(aws_vpc.two-tier-vpc.cidr_block, 8, count.index + 1)}"
   availability_zone = "${data.aws_availability_zones.available.names[count.index >=2 ? (count.index)-2 : count.index]}"
   vpc_id            = aws_vpc.two-tier-vpc.id
   map_public_ip_on_launch = true
   tags = {
     Name        = "${var.subnets[count.index]}"
   }
 }
Above I have used data block which provide dynamic information about entities that are not managed by the current Terraform and configuration but allow data to be fetched or computed for use elsewhere in Terraform configuration.
Also, there is cidrsubnet function which is used to calculates a subnet address within given IP network address prefix. You can use terraform console to see the output of the function as shown below.

Creation of Internet Gateway
- Create Internetgateway.tf file to store the script to create internet gateway and attach it to the existing VPC.
resource "aws_internet_gateway" "two-tier-IGW" {
  vpc_id = aws_vpc.two-tier-vpc.id
  tags   = {
    Name = "2tier-IGW"
}
}
Creation of Route Tables
- Create route_tables.tf to create route tables for web tier and database tier and associate the respective subnets to it.
# Creating route table for webtier
resource "aws_route_table" "webtier-RT" {
  vpc_id = aws_vpc.two-tier-vpc.id
  route {
    cidr_block = "0.0.0.0/0"
    gateway_id = aws_internet_gateway.two-tier-IGW.id
  }
  tags = {
    Name = "webtier-RT"
  }
}

# associating subnet with route table for web tier
resource "aws_route_table_association" "webtier-sub-association" {
  subnet_id      = aws_subnet.subnets[count.index].id
  route_table_id = aws_route_table.webtier-RT.id
  count = 2

}

# creating route table for rds tier
resource "aws_route_table" "rdstier-RT" {
  vpc_id = aws_vpc.two-tier-vpc.id
  tags = {
    Name ="RDStier-RT"
  }
}

# associating subnet with route table for rds tier
resource "aws_route_table_association" "rdstier-sub-association" {
  subnet_id      = aws_subnet.subnets[count.index+2].id
  route_table_id = aws_route_table.rdstier-RT.id
  count = 2
}
Creation of Application load balancer
First let's understand what are Modules in terraform. Modules are containers for multiple resources that are used together. Modules are the main way to package and reuse resource configurations with Terraform.
First I have created a folder name modules with sub-folder name SecurityGroup where I will be storing configuration files for load balancer security group.
Create modules/SecurityGroup/alb_sg.tf
 variable "vpc_id" {}

 resource "aws_security_group" "alb_security_group" {
   name        = "webtier_alb_security_group"
   description = "security group for alb"
   vpc_id      = var.vpc_id

   ingress {
     description      = "https access"
     from_port        = 443
     to_port          = 443
     protocol         = "tcp"
     cidr_blocks      = ["0.0.0.0/0"]
   }
   ingress {
     description      = "http access"
     from_port        = 80
     to_port          = 80
     protocol         = "tcp"
     cidr_blocks      = ["0.0.0.0/0"]
   }

   ingress {
     description      = "ssh access"
     from_port        = 22
     to_port          = 22
     protocol         = "tcp"
     cidr_blocks      = ["0.0.0.0/0"]
   }
   tags   = {
     Name = "webtier-alb-sg"
   }
 }
All resource instances, names, and therefore, resource visibility, are isolated in a module's scope. If you want to access some details for the resources in another module, you'll need to explicitly configure that. So we must declare an
outputvalue in the module to export its resource, or an attribute of a resource, to other modules.Create modules/SecurityGroup/output.tf under the same module directory.
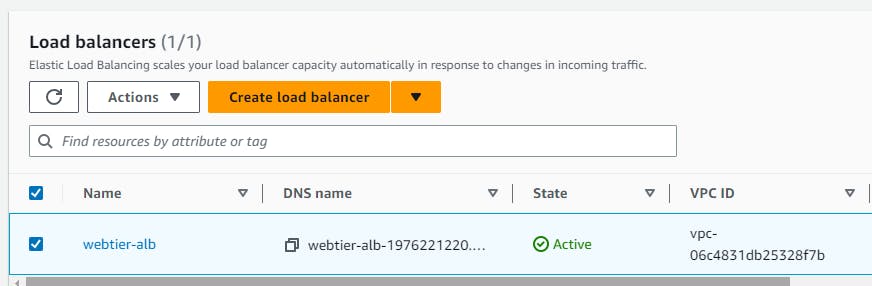
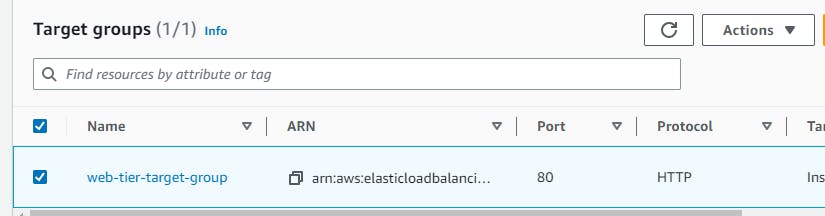
 output "alb-sg-id" {
   value = aws_security_group.alb_security_group.id
 }
Create ApplicationLoadBalacer.tf under the main directory(3week). Below I have created Application load balancer, listener and target groups and used the module block for reusing the security group for ALB.
 module "webtier-alb-SG" {
   source = "./modules/SecurityGroup/"
   vpc_id = aws_vpc.two-tier-vpc.id
 }

 #creating application load balancer
 resource "aws_lb" "web-tier-alb" {
   name               = "webtier-alb"
   internal           = false
   load_balancer_type = "application"
   security_groups    = [module.webtier-alb-SG.alb-sg-id]
   subnets            = [aws_subnet.subnets[0].id, aws_subnet.subnets[1].id]
 }

 #creating listener
 resource "aws_lb_listener" "http" {
   load_balancer_arn = aws_lb.web-tier-alb.arn
   port              = "80"
   protocol          = "HTTP"
   default_action {
     type = "forward"
     forward {
       target_group {
         arn = aws_lb_target_group.web-tier-TG.arn
       }
     }
   }
 }

 # Create ALB target group
 resource "aws_lb_target_group" "web-tier-TG" {
   name     = "web-tier-target-group"
   port     = 80
   protocol = "HTTP"
   vpc_id   = aws_vpc.two-tier-vpc.id
   target_type = "instance"
   health_check {
     healthy_threshold   = 2
     unhealthy_threshold = 10
     timeout             = 40
     interval            = 50
     path                = "/"
     port                = 80
   }
 }
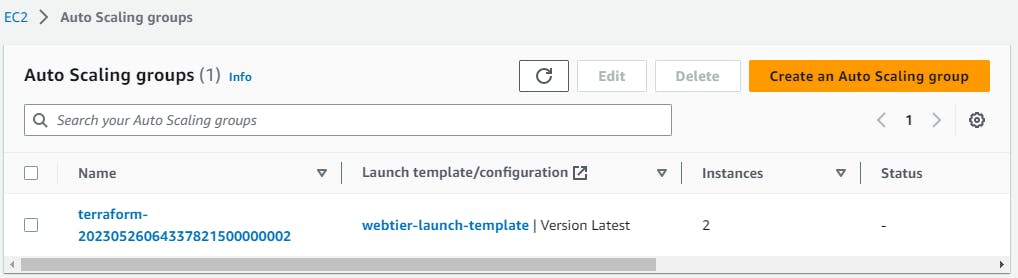
Creation of AutoScaling Group
Create modules/ec2_security_group/ec2_security_group.tf
 variable "vpc_id" {}
 variable "alb-security-group" {}
 # creating security group for ec2 instances
 resource "aws_security_group" "ec2-sg" {
   name        = "web-tier-sg"
   description = "Allow http and https and ssh"
   vpc_id      = var.vpc_id

   ingress {
     description      = "TLS from VPC"
     from_port        = 443
     to_port          = 443
     protocol         = "tcp"
     security_groups = [var.alb-security-group]
   }
   ingress {
     description      = "http"
     from_port        = 80
     to_port          = 80
     protocol         = "tcp"
     cidr_blocks      = ["0.0.0.0/0"]
   }
   ingress {
     description      = "ssh"
     from_port        = 22
     to_port          = 22
     protocol         = "tcp"
     cidr_blocks      = ["0.0.0.0/0"]
   }
   egress {
     from_port        = 0
     to_port          = 0
     protocol         = "-1"
     cidr_blocks      = ["0.0.0.0/0"]
     ipv6_cidr_blocks = ["::/0"]
   }

   tags = {
     Name = "web-tier-sg"
   }
 }
Create modules/ec2_security_group/output.tf
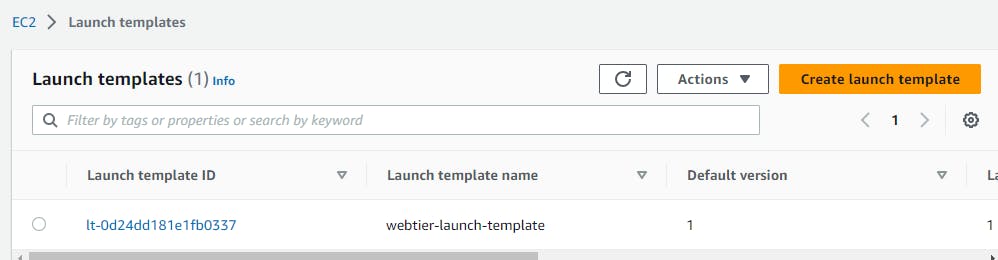
 output "ec2-sg-id" {
   value = aws_security_group.ec2-sg.id
 }
Create AutoScalingGroup.tf under 3week directory. Create launch template resource block and autoscaling resource Block.
 module "ec2-security-group" {
   source = "./modules/ec2_security_group"
   vpc_id = aws_vpc.two-tier-vpc.id
   alb-security-group = module.webtier-alb-SG.alb-sg-id

 }
 ## Creating Launch templates
 resource "aws_launch_template" "webtier-launch-template" {
   name = "webtier-launch-template"
   description = "My Web tier Launch Template"
   image_id = var.ec2_ami
   instance_type = var.instance_type
   vpc_security_group_ids = [module.ec2-security-group.ec2-sg-id]
   key_name = "ec2_key"
   user_data = filebase64("./user_data.sh")
   tag_specifications {
     resource_type = "instance"
     tags = {
       Name = "asg_instances"
     }
   }

 }

 ## Creating AutoScaling Group
 resource "aws_autoscaling_group" "example" {
   launch_template {
     id      = aws_launch_template.webtier-launch-template.id
     version = "$Latest"

   }
   vpc_zone_identifier = [aws_subnet.subnets[0].id,aws_subnet.subnets[1].id]
   desired_capacity   = 2
   min_size = 2
   max_size = 3
   target_group_arns = [aws_lb_target_group.web-tier-TG.arn]
 }
Below is the user data that is used in the launch template resource block.
Create user_data.sh
 #!/bin/bash
 yum update -y
 yum install httpd -y
 systemctl start httpd
 systemctl enable httpd
 echo "<html><body><h1>this is third week challenge</h1></body></html>" > /var/www/html/index.html
Creation of RDS Instance
Create rds-security-group.tf
 resource "aws_security_group" "rds_sg" {
   name        = "rds-private-sg"
   description = "Allow web tier and ssh traffic"
   vpc_id      = aws_vpc.two-tier-vpc.id

   ingress {
     from_port        = 3306
     to_port          = 3306
     protocol         = "tcp"
     cidr_blocks      = [var.vpc_cidr]
     security_groups = [ "${module.ec2-security-group.ec2-sg-id}" ]
   }
   ingress {
     from_port         = 22
     to_port           = 22
     protocol          = "tcp"
     cidr_blocks       = ["0.0.0.0/0"]
   }
   egress {
     from_port        = 0
     to_port          = 0
     protocol         = "-1"
     cidr_blocks      = ["0.0.0.0/0"]

   }
 }
Create database.tf to create MySQL databse.
 # Database subnet group
 resource "aws_db_subnet_group" "db_subnet"  {
     name       = "db-subnet"
     subnet_ids = [aws_subnet.subnets[2].id, aws_subnet.subnets[3].id]
 }

 # Create database instance
 resource "aws_db_instance" "project_db" {
   allocated_storage    = 5
   engine               = "mysql"
   engine_version       = "5.7"
   instance_class       = "db.t2.micro"
   identifier           = "db-instance"
   db_name              = "sqldatabase"
   username             = "admin"
   password             = "password"
   db_subnet_group_name = aws_db_subnet_group.db_subnet.id
   vpc_security_group_ids = [aws_security_group.rds_sg.id]
   publicly_accessible = false
   skip_final_snapshot  = true
   multi_az = true
 }
Terraform commands
terraform init: The terraform init command initializes a working directory containing Terraform configuration files. This is the first command that should be run after writing a new Terraform configuration or cloning an existing one from version control. It is safe to run this command multiple times. You can use the init command to upgrade the providers and modules for your project.
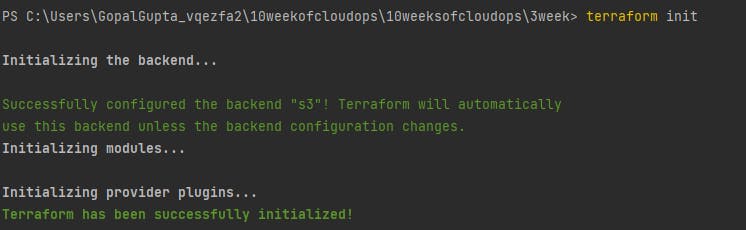
You can view your backend will be created when you run this command.
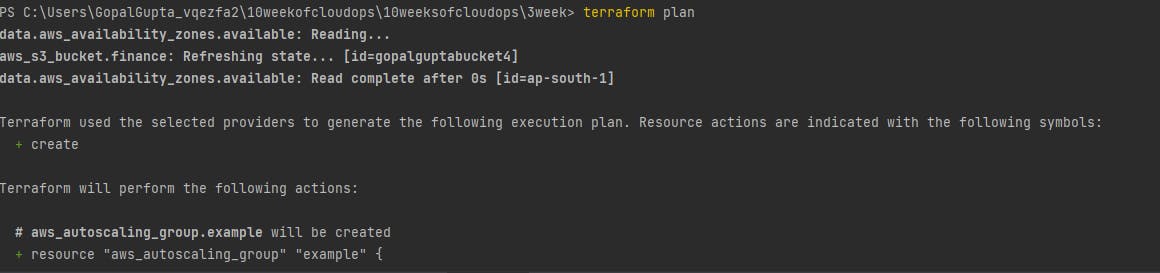
terraform plan: The terraform plan command creates an execution plan, which lets you preview the changes that Terraform plans to make to your infrastructure. By default, when Terraform creates a plan it: Reads the current state of any already-existing remote objects to make sure that the Terraform state is up-to-date.
terraform apply: The terraform apply command executes the actions proposed in a Terraform plan to create, update, or destroy infrastructure.
\> terraform apply --auto-approve command to skip approval execution
You can view all the resources been created.

Now grab one of the instance's public IP and paste it into your browser.

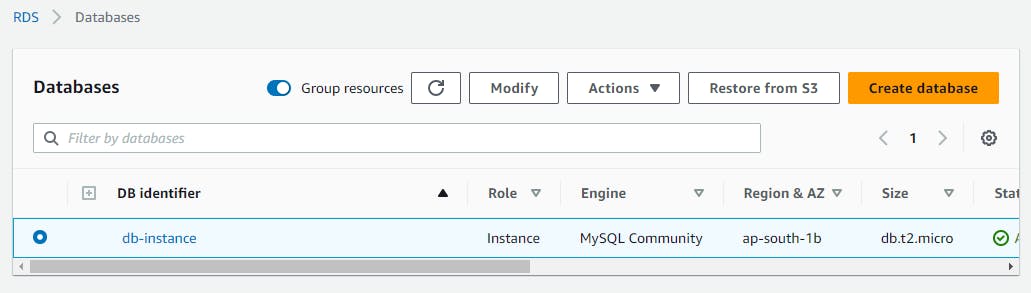
Below you can see your db instance has been created.
Now we will see the connection to the database from the instance of the webtier.
ssh to your instance using ec2_key.pem file which has been used to create launch templates.
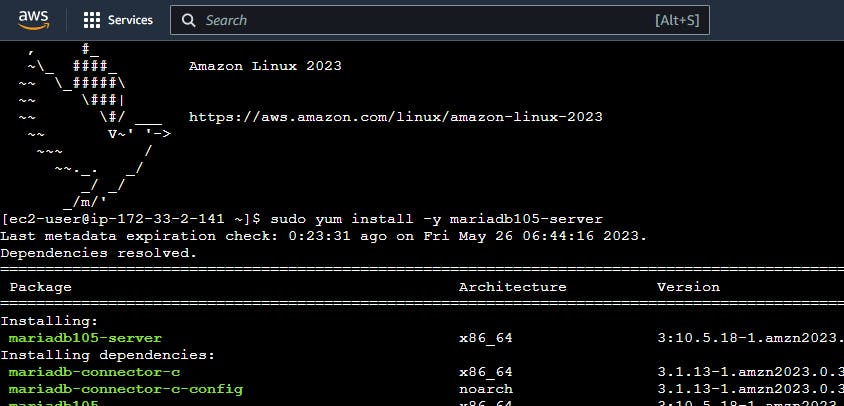
Install mariadb in your system using below command:
\> sudo yum install -y mariadb105-server
To connect to the database, you need the endpoint of your DB instance, user name and password. Run the below command.
mysql -h db-instance.ci8z8pivy02r.ap-south-1.rds.amazonaws.com -P 3306 -u admin -p

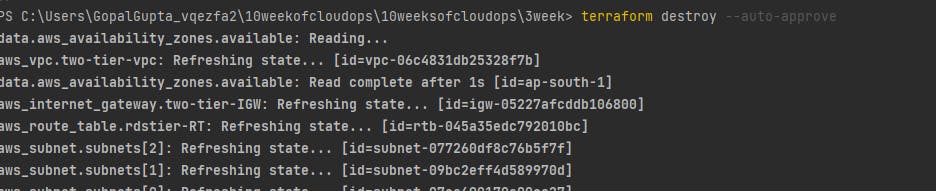
terraform destroy --auto-approve: to destroy the resources provisioned through terraform. Don't forget to run this command to delete the resources you created.
Below is my Github link where you can find all the configuration file.
https://github.com/gopal1gupta/2tier-app-aws-with-terraform
Thank you for reading my Blog !!!!!!!!!!!!!
References:
https://registry.terraform.io/providers/hashicorp/aws/latest/docs/resources/vpc
https://registry.terraform.io/providers/hashicorp/aws/latest/docs/resources/subnet
https://registry.terraform.io/providers/hashicorp/aws/latest/docs/resources/route_table
https://registry.terraform.io/providers/hashicorp/aws/latest/docs/resources/lb
https://registry.terraform.io/providers/hashicorp/aws/latest/docs/resources/autoscaling_group